JonMan94
Senior Member
- Joined
- Sep 22, 2008
- Messages
- 6,479
- Reaction score
- 1,671
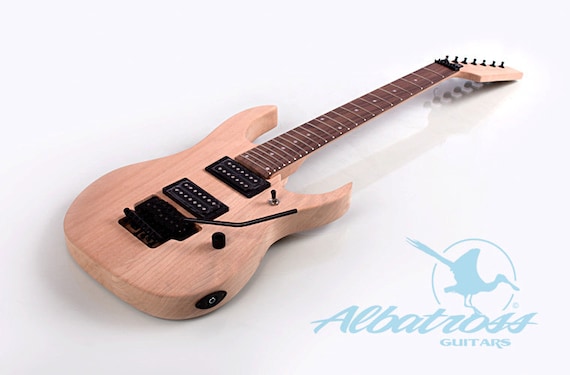
Whelp, decided to kick off 2015 with a new build: An Albatross Guitars DIY RG-7 string guitar kit.
Going back to late January, I picked up something that I remembered seeing last year at the Orlando Guitar Show: an old Takeuchi Lo-TRS seven string trem.

And a week or two later, I was able to find someone who could make a Fat Brass block to replace the thin pot-metal one, along with wrestling the old tremolo arm collar out and replacing it with a normal FR one (from the tremolo that came with the kit).

Fast-forward to February 27th, with class canceled that day and the following week being spring break, I took a drive to the Macdill AFB's wood hobby shop to begin doing wood-work, this time around, I had alot less to worry about:

First thing done was the headstock being cut into the Ibanez shape as best as I could trace from the old headstock of my GIO's old neck that I had saved for that purpose, but more importantly, I wanted to expand the control cavity so that I could have two volumes and a tone for each humbucker. At home, I managed to cut out a back-plate from my failed attempt at making a pick-guard for the GIO project, and by using it to trace an outline on the body of the proposed route, I took the slow and stready route of using various-sized hole-cutting bits and a smaller drill press to get the cavity I wanted. First I did the outline to a depth that was equal to the thickness of the back-plate, then I started making the actual cavity, using the original one as the guide for depth.

The finished result of this tactic:

And then doing the trem claw holes and drilling the mounting screw holes in the neck:

The finished work at the shop:

At home, using twine, I checked for alignment and proper bridge location, which is dead on, though the neck does shift slightly (hopefully i will fix that with some spray-paint on the walls of the pocket).

So far the only additional progress I have made is the purchase and direct-mounting of a set of stock pickups from a PRS SE-24 Seven string, the bridge coming in at 16k, the neck at 10k. I also purchased a 6.5in x 35in leaf of figured Anigre veneer from ebay, which looks exactly like really good flame maple.

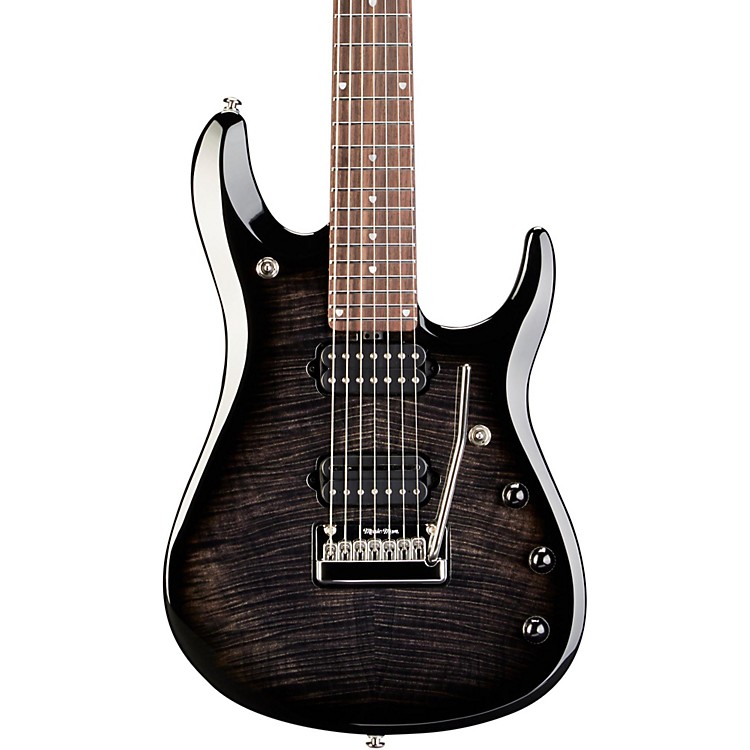
I had intended to just paint the body in a solid color, but after deliberating on how to make the PU cavities smaller in overall size to complement the direct-mounted look and fill in the old pot-hole in the top, I ended up deciding on doing a figured veneer and a black-burst finish similar to this:
I think by now you guys are seeing the theme of this build, right? I will try to post more pictures as I take them, the next part will be the veneering and painting of the body and neck, hopefully this time I manage to do it right like I did with the Les Paul rebuild a year ago.
Going back to late January, I picked up something that I remembered seeing last year at the Orlando Guitar Show: an old Takeuchi Lo-TRS seven string trem.
And a week or two later, I was able to find someone who could make a Fat Brass block to replace the thin pot-metal one, along with wrestling the old tremolo arm collar out and replacing it with a normal FR one (from the tremolo that came with the kit).
Fast-forward to February 27th, with class canceled that day and the following week being spring break, I took a drive to the Macdill AFB's wood hobby shop to begin doing wood-work, this time around, I had alot less to worry about:
First thing done was the headstock being cut into the Ibanez shape as best as I could trace from the old headstock of my GIO's old neck that I had saved for that purpose, but more importantly, I wanted to expand the control cavity so that I could have two volumes and a tone for each humbucker. At home, I managed to cut out a back-plate from my failed attempt at making a pick-guard for the GIO project, and by using it to trace an outline on the body of the proposed route, I took the slow and stready route of using various-sized hole-cutting bits and a smaller drill press to get the cavity I wanted. First I did the outline to a depth that was equal to the thickness of the back-plate, then I started making the actual cavity, using the original one as the guide for depth.
The finished result of this tactic:
And then doing the trem claw holes and drilling the mounting screw holes in the neck:
The finished work at the shop:
At home, using twine, I checked for alignment and proper bridge location, which is dead on, though the neck does shift slightly (hopefully i will fix that with some spray-paint on the walls of the pocket).
So far the only additional progress I have made is the purchase and direct-mounting of a set of stock pickups from a PRS SE-24 Seven string, the bridge coming in at 16k, the neck at 10k. I also purchased a 6.5in x 35in leaf of figured Anigre veneer from ebay, which looks exactly like really good flame maple.
I had intended to just paint the body in a solid color, but after deliberating on how to make the PU cavities smaller in overall size to complement the direct-mounted look and fill in the old pot-hole in the top, I ended up deciding on doing a figured veneer and a black-burst finish similar to this:
I think by now you guys are seeing the theme of this build, right?
I will try to post more pictures as I take them, the next part will be the veneering and painting of the body and neck, hopefully this time I manage to do it right like I did with the Les Paul rebuild a year ago.